🔌 Why You Should Be Using Static Mesh Sockets
Static mesh sockets are one of Unreal Engine’s most overlooked features. While most developers are familiar with skeletal mesh sockets for attachments, static mesh sockets open the door to smarter workflows, cleaner code, and more flexible design tools. In this post, we’ll explore how to use them for attachments, animation, hitboxes, and beyond - turning a simple concept into a powerful data-driven system that makes your game easier to build and more fun to design.
# Table of Contents
- What Are Static Mesh Sockets?
- How to Define Them
- When to Use Them
- Offset Sockets
- Animating Props with Control Rig in Sequencer
- Hitboxes
- Other Types of Sockets
- Final Thoughts
# What Are Static Mesh Sockets?
If you’ve spent any amount of time in Unreal Engine, you are likely already familiar with skeletal mesh sockets.
Sockets in principle are transforms (location, rotation & scale) declared at design-time in a “relative-to-something” space. In the case of skeletal mesh sockets they define a transform relative to a parent bone in the skeletal mesh. It is no surprise then that static mesh sockets define a transform relative to a static mesh.
To keep things simple let us set aside a few (but important) differences between skeletal mesh and static mesh sockets for now and only talk of static mesh sockets as per our definition:
A relative-to-something transform declared at design-time.
What I will show here applies to all types of sockets which we will explore a bit in Other Types of Sockets.
# How to Define Them
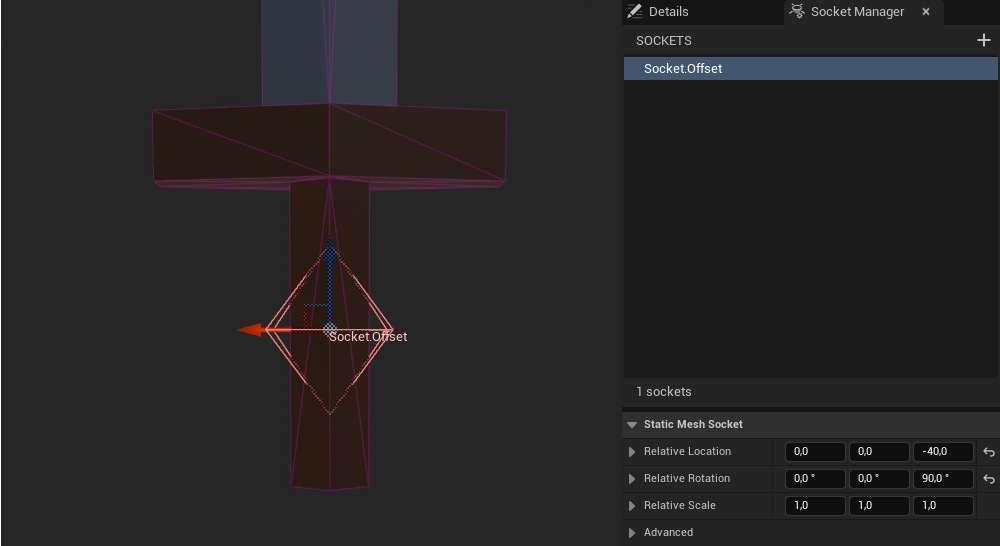
Very simple once you know how, but easily overlooked. Open up any static mesh in the editor and select the “Socket Manager” tab next to the “Details” tab.

The + button adds a moveable socket at location (0,0,0) to our mesh and allows us to give it a name.
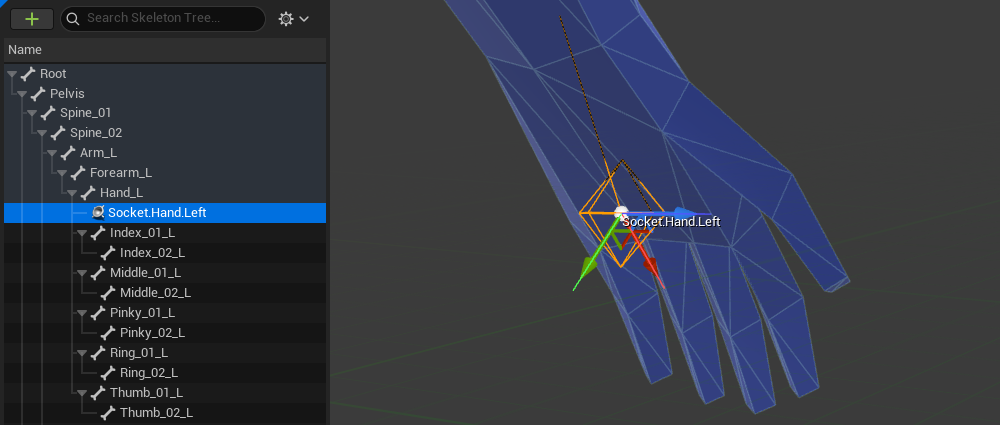
I recommend using a naming convention compatible with gameplay tags (e.g. Socket.Type.Variant) and sticking to it for all of our meshes & sockets.
That way we get all the advantages of gameplay tags and can easily refer to commonly available sockets in our project without the risk of typos.
# When to Use Them
The most commonly referred to use case in Unreal Engine documentation & tutorials is of course attachment. I.e. if we wanted to attach something to our static mesh we would use a socket. But that is only the tip of the iceberg. Games are hungry for many different kinds of transforms and sockets can do so much more!
Let’s have a look at how we can enable some powerful data-driven workflows using sockets.
# Offset Sockets
We will start with something familiar: skeletal mesh attachment.
# The Problem with Attachment
All attachment functions & nodes in the engine allow us to specify the parent’s socket name to attach the child to. Let’s look at a small example to demonstrate an issue here.
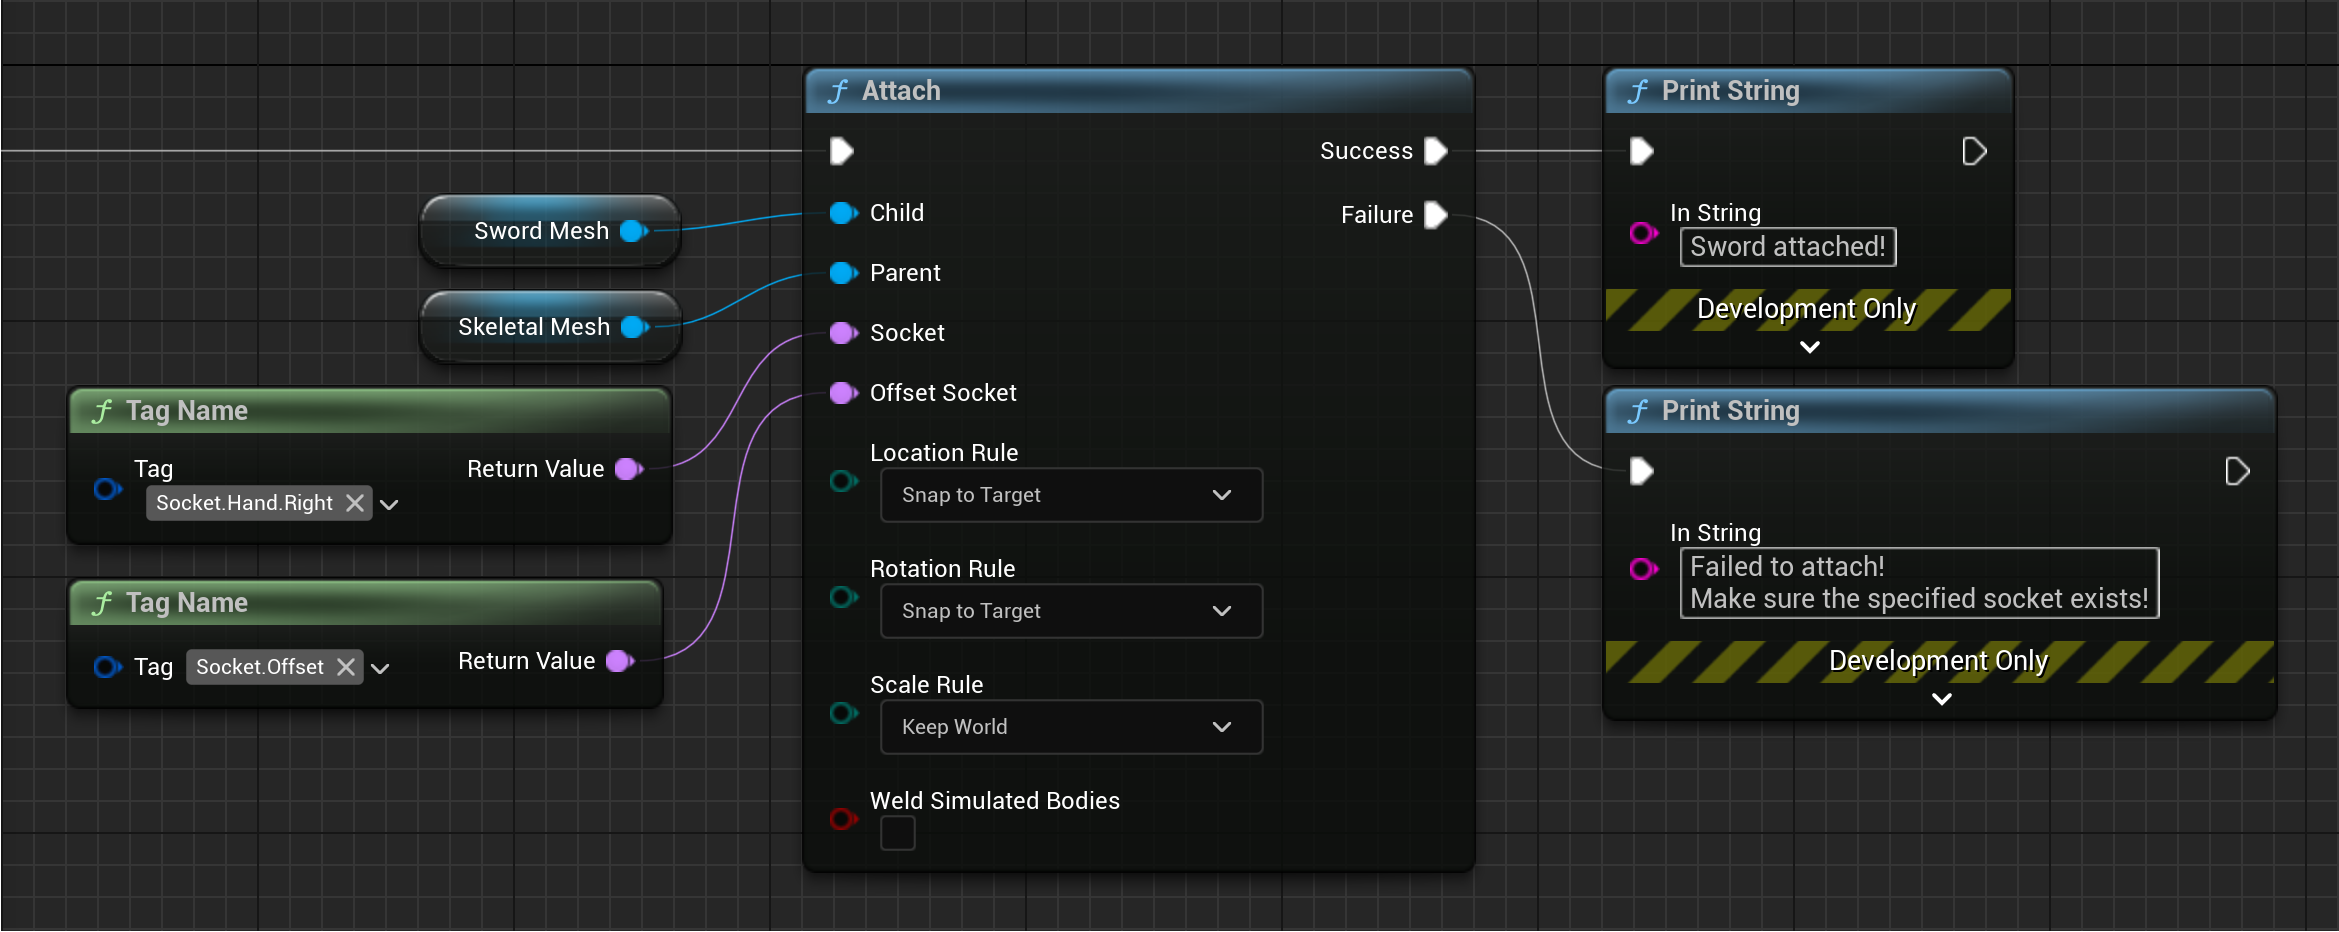
We have a simple pawn with a skeletal mesh, and we want to attach a sword static mesh to its Socket.Hand.Right socket.
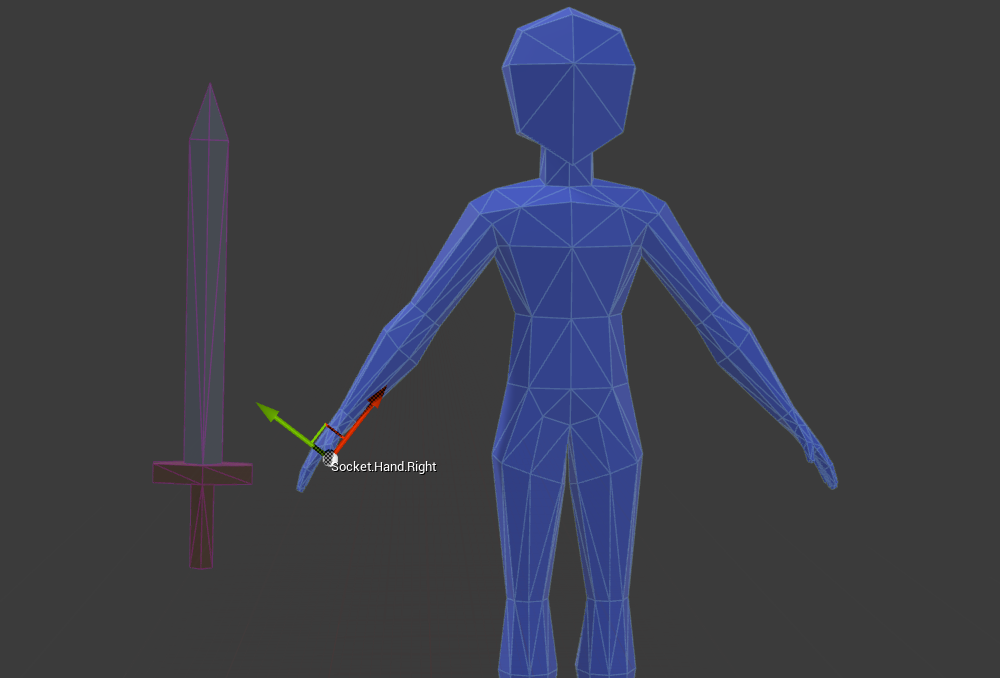
We can implement this in blueprint like so:
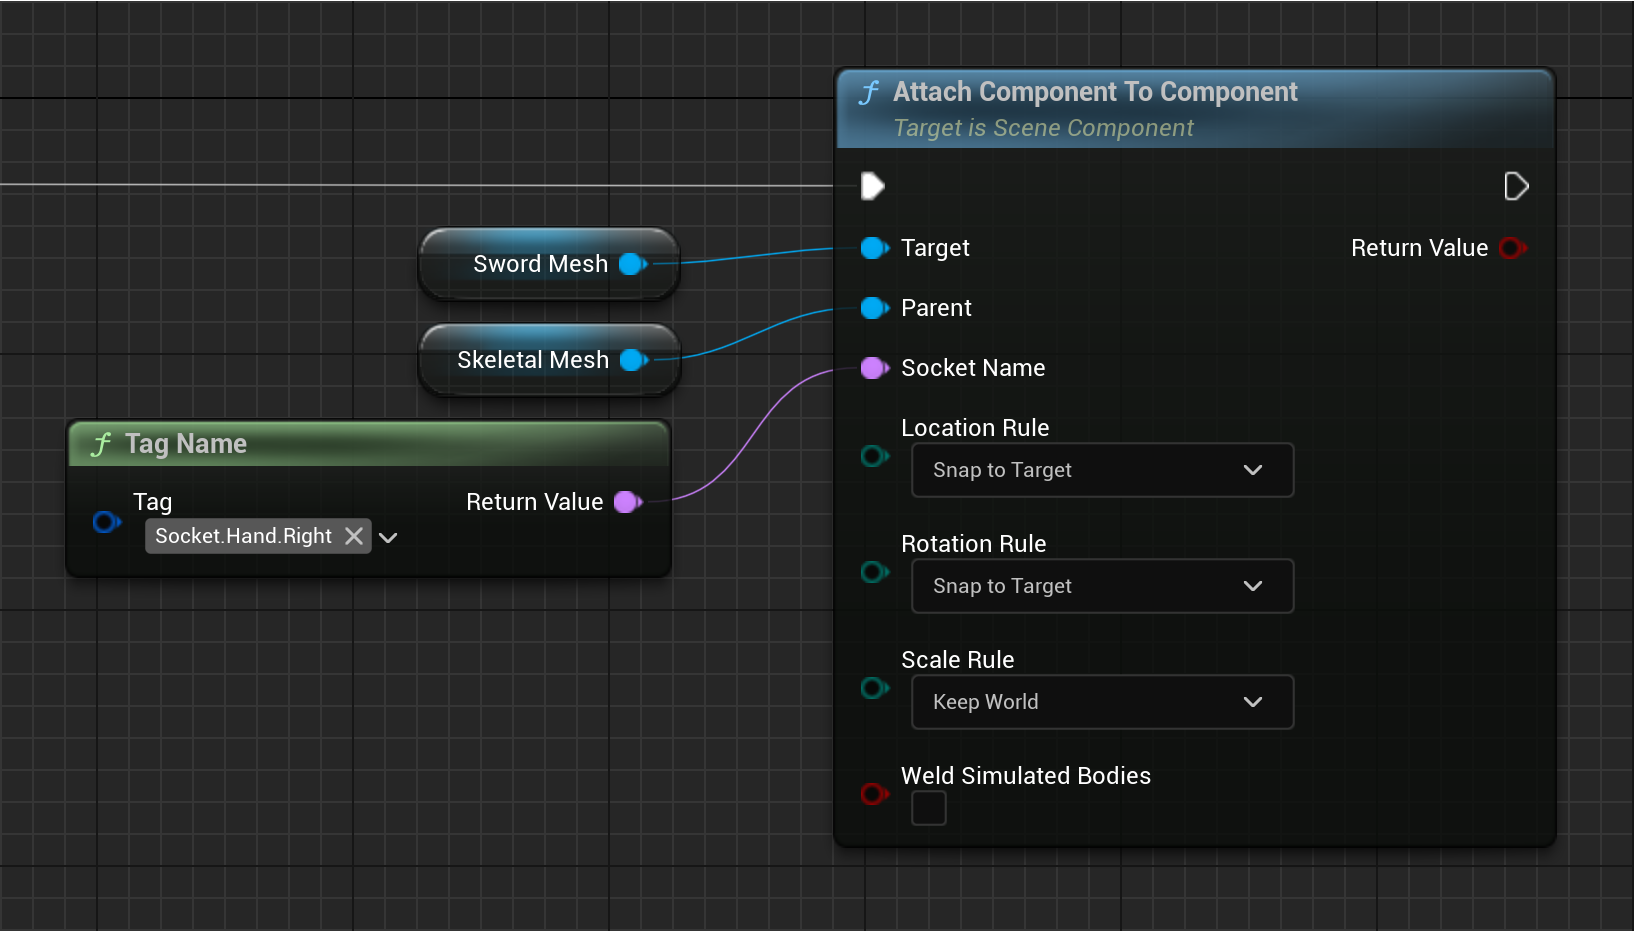
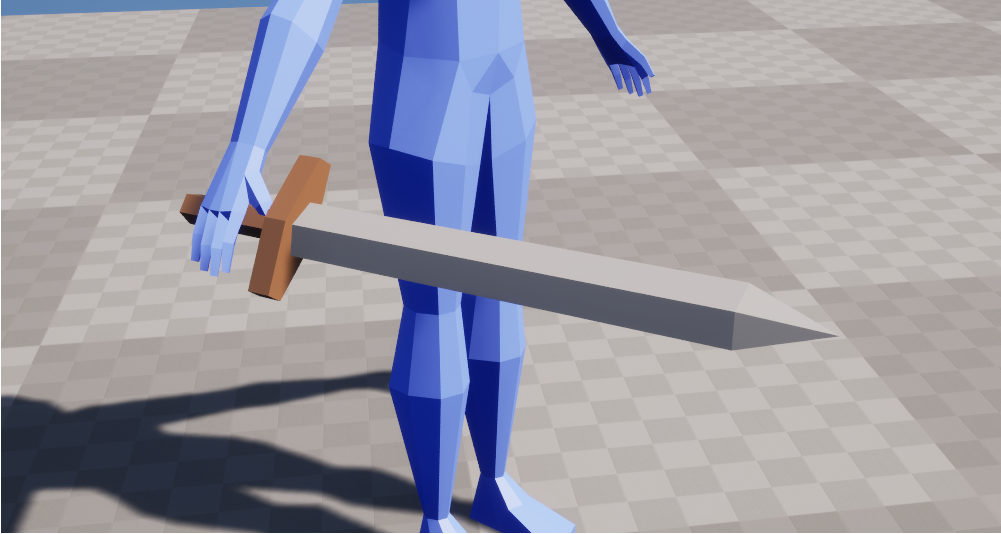
Which gives us this result in-game.
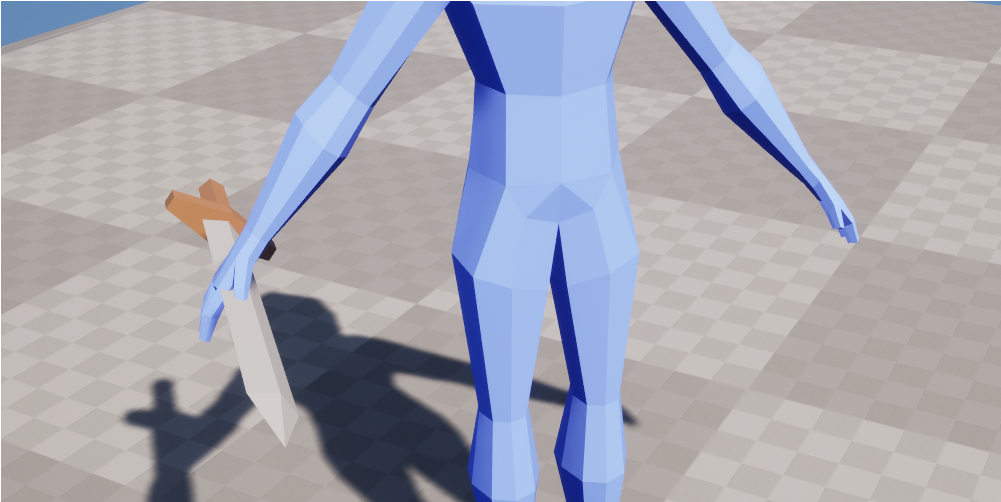
Oh no! That is not how you should ever hold a sword! What happened?
Whenever we attach a child to a parent we can specify the parent socket name, but the child is always attached using the origin of the mesh. When I created the sword mesh in Blender I used the geometric center of the mesh as its origin. Unreal will always use this point to do the attachment.
# Common Solutions
The most straightforward way would be to adjust the location/rotation of our Socket.Hand.Right skeletal mesh socket.
This works just fine depending on the project’s complexity. If we only have a few weapon types with similar proportions this is the way to go.
But we should be aware of a few caveats here:
- ❌ Need to manage dedicated sockets per weapon type…
- ❌ …per skeleton…
- ❌ …per use case (e.g. sheathed, unsheathed, left hand, right hand).
- ❌ Weapons with significantly different proportions require extra sockets.
A workflow that solves these issues is to go back to Blender and set the origin to the hilt of the sword. Again, depending on the project’s complexity this will work just fine. But now there are some other aspects we need to consider:
- ❌ Have to go back-and-forth between Unreal and Blender to adjust center points.
- ❌ Need to think about where to put the origin for each mesh.
- ❌ Cannot use the geometric center or center of mass of the mesh (relevant for distance checks, calculating bounds, physics etc.).
- ❌ When we rotate the sword mesh it now rotates with the hilt as its pivot.
- ❌ Changes to the origin affect all characters and use cases.
We could also try to provide an explicit offset transform for our sword attachment.
Great, that worked! But now we have a set of new issues:
- ❌ Have to manually manage offset transforms for different types of weapons with varying proportions
- ❌ Have to manually manage offset transforms for different uses cases etc.
- ❌ Designers need to understand this new system.
- ❌ Designers have to guesstimate where the correct transform on the mesh should be.
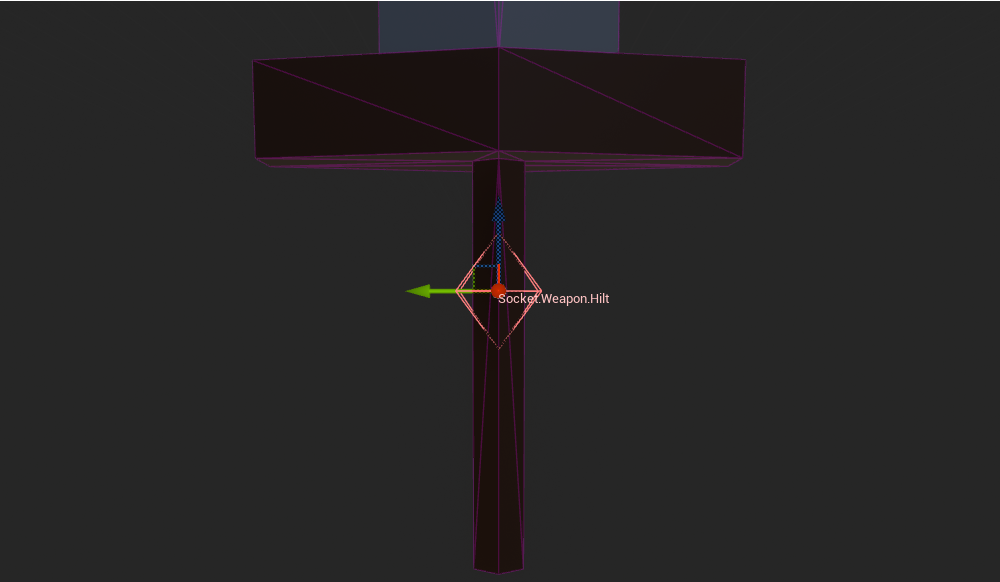
# The Socket Way
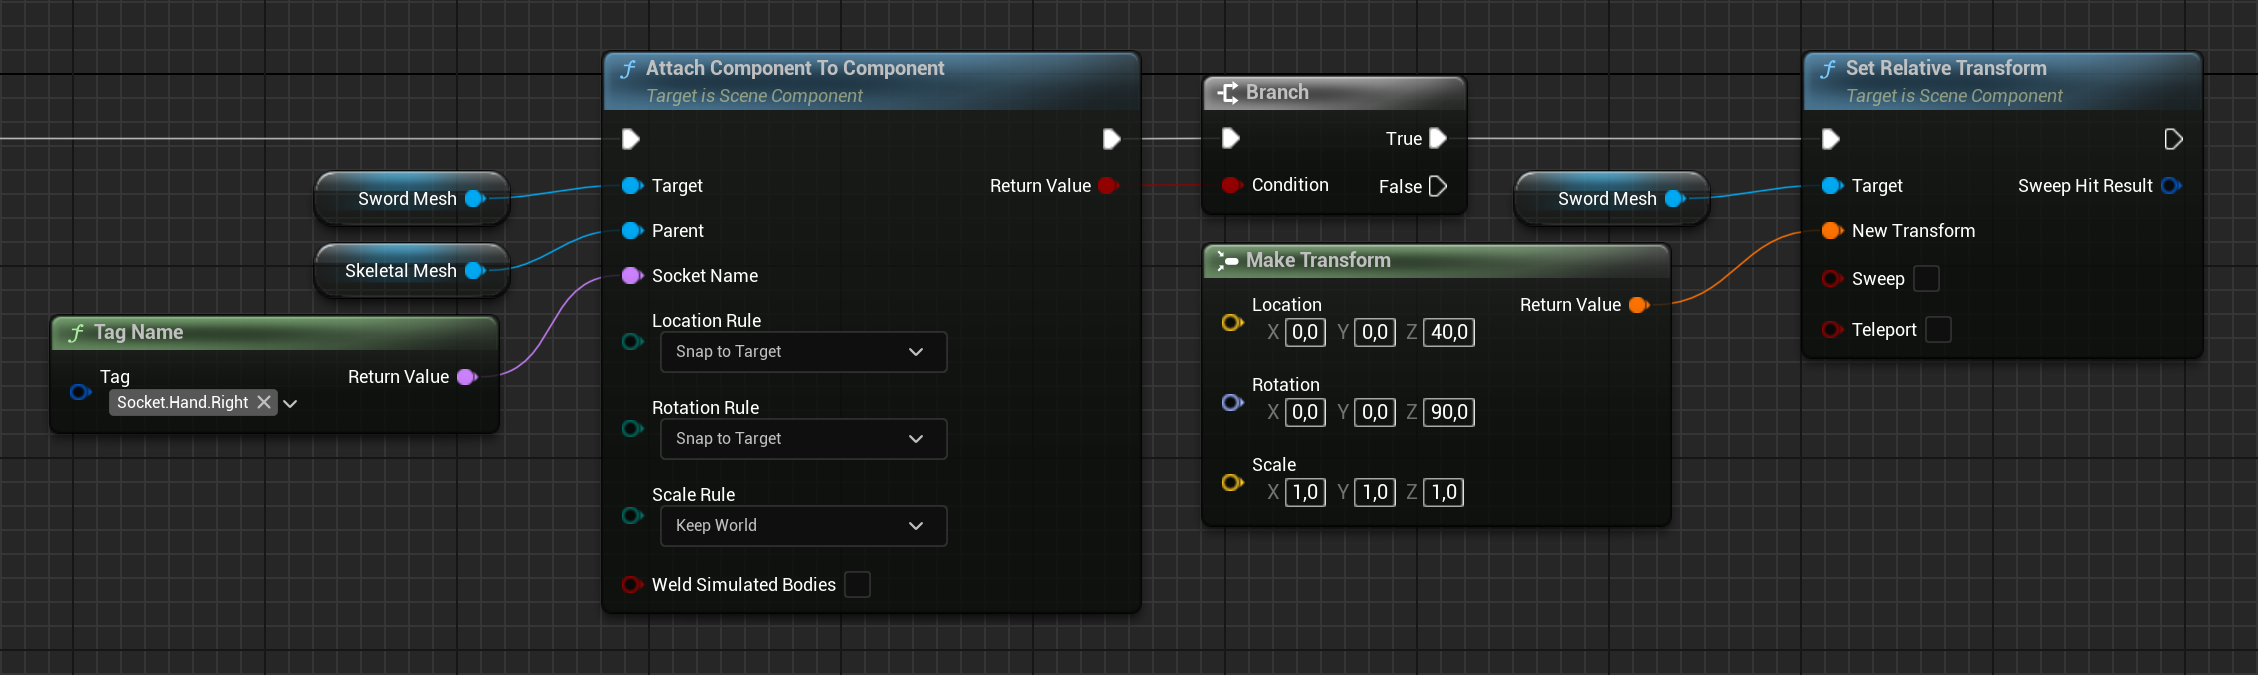
Maybe you already get where I am going with this. It seems we are trying to solve the wrong problem. What do we actually need here? That’s right! We can declare a relative-to-our-sword transform at design-time! We tell Unreal: “Hey, when you attach this sword to our pawn’s hand make sure you use the hilt instead of the origin”.
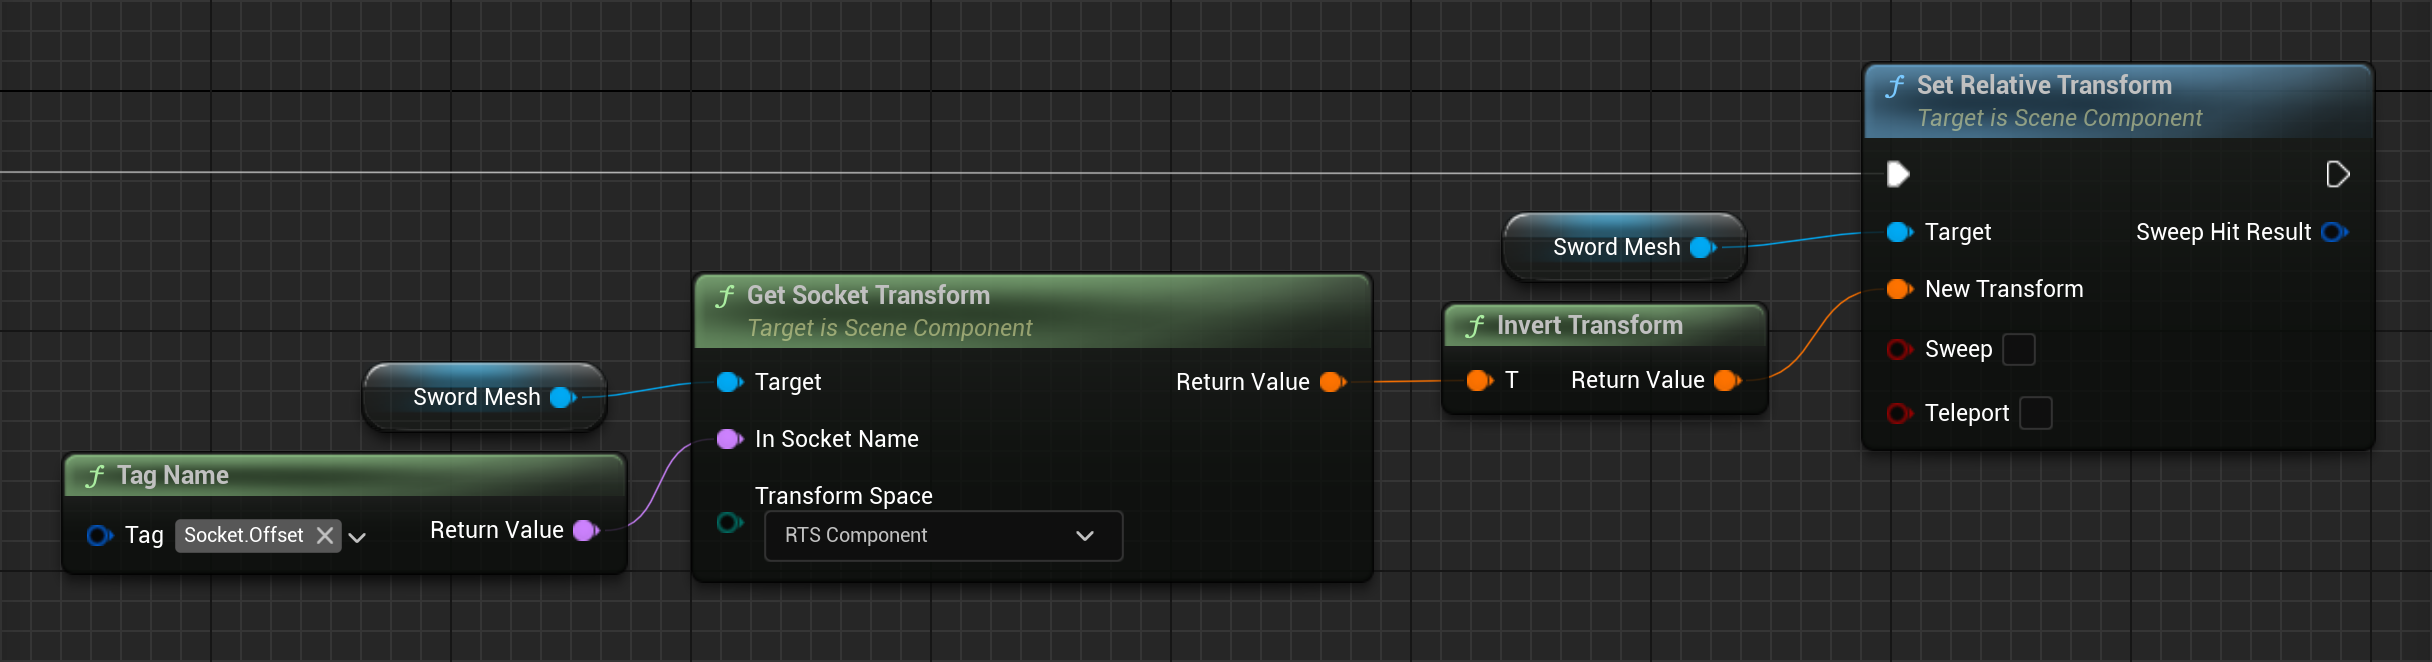
We then use the inverse transform of this socket to apply an appropriate offset.
Why the inverse transform? Since we want the offset socket to overlap the parent socket we must offset the entire mesh in the opposite direction.
Hence the naming Socket.Offset. Since static mesh sockets are relative to the origin of the mesh (i.e. in component space) we can directly apply their transforms as an offset to the owning mesh component.
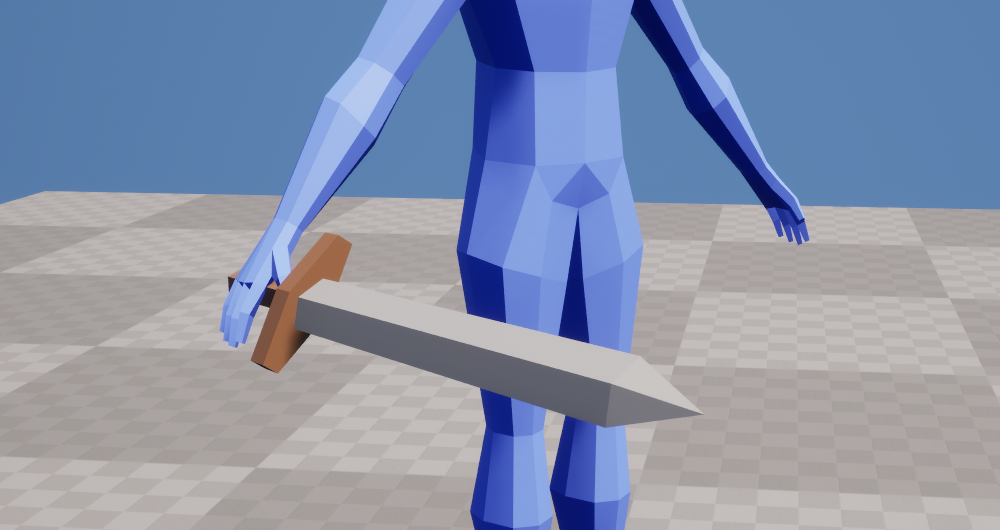
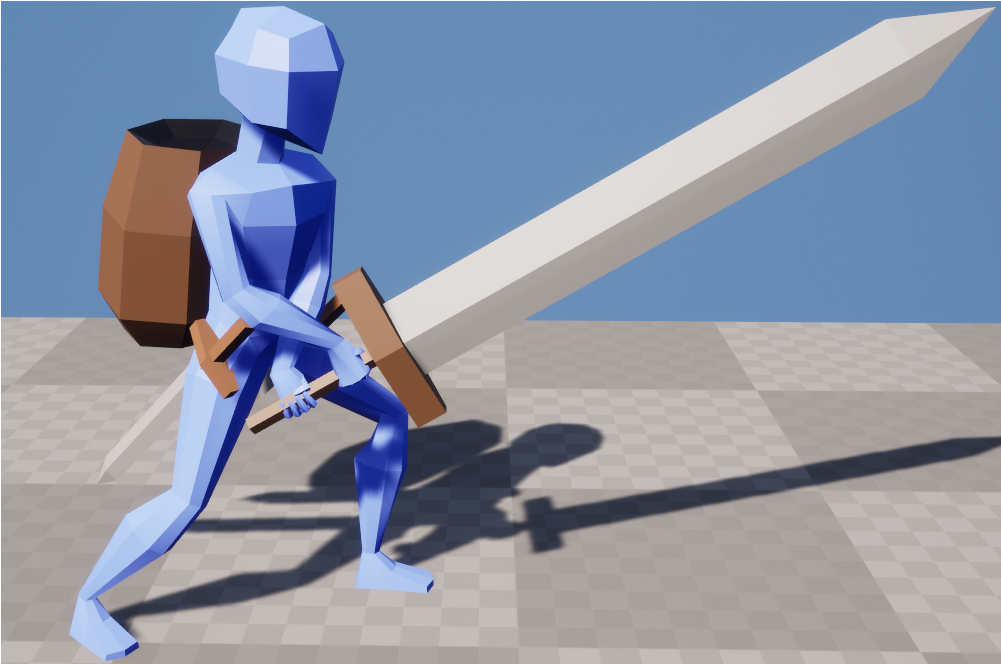
Perfect! The sword is attached correctly and our prior worries about mesh origins & offset transforms are resolved:
- ✔️ No back-and-forth between Unreal and Blender.
- ✔️ No need to think about where the origin is.
- ✔️ We get the advantages of using the geometric center or center of mass as the origin.
- ✔️ When we rotate the sword mesh it rotates around the geometric center or center of mass.
- ✔️ Different types of weapons with varying proportions can specify where exactly their hilt is on the mesh.
- ✔️ Different use cases (e.g. sheathed, unsheathed, left hand, right hand) can be covered by declaring new offset sockets.
- ✔️ Changes to an offset socket only affect one weapon and the socket’s use case.
- ✔️ Designers can use familiar tools and a nice UI.
- ✔️ Designers don’t have to guesstimate the offsets for each mesh.
If we wrap this convention in a few nice C++ functions and expose them to blueprint we won’t need to think about much at all when dealing with attachments. For blueprint projects we can wrap the previous couple of nodes in a blueprint function library.
EResult Attach(USceneComponent* Child, USceneComponent* Parent, const FName Socket, const FName OffsetSocket, const FAttachmentTransformRules AttachmentRules)
{
    if (IsValid(Child) && IsValid(Parent))
    {
        if (Child->AttachToComponent(Parent, AttachmentRules, Socket))
        {
            // We need Component space since we apply this transform as a relative offset
            if (const auto Transform = GetSocketTransform(Child, OffsetSocket, RTS_Component))
            {
                Child->SetRelativeTransform(Transform->Inverse());
            }
            return EResult::Success;
        }
    }
    return EResult::Failure;
}

// Only returns a valid transform if the socket truly exists
TOptional<FTransform> GetSocketTransform(const USceneComponent* Component, const FName Socket, const ERelativeTransformSpace Space)
{
    return IsValid(Component) && !Socket.IsNone() && Component->DoesSocketExist(Socket) ? Component->GetSocketTransform(Socket, Space) : TOptional<FTransform>();
}
Curious about TOptional or EResult? Check out my post on Improving Program Flow In UE5 C++ & Blueprint.
And voilà, our worries about attachment are a thing of the past. Once exposed to blueprint we get:
Now that attachment is solved, we can have some fun with it.
When making heavy use of sockets like this it is recommended to pick a project convention regarding the orientation of meshes & sockets and strictly follow it. For example, Unreal Engine uses x-forward and z-up. It can be helpful to orient all meshes & sockets with that in mind. Being consistent with transforms is important and will save us headaches going forward.
Depending on the use case we should also consider performance of multiple socket lookups. We are iterating a (small) array of objects multiple times. If we find a significant performance impact we could:
- Cache socket transforms after the first lookup (since they do not change)
- Manually iterate
UStaticMesh::Socketsonce to find all relevant sockets in O(n) - Use
UStaticMesh::GetSocketsByTagto find all relevant sockets in O(n)
But the old adage applies: Unmeasured optimization is the root of all evil.
# Animating Props with Control Rig in Sequencer
When using control rig to animate in sequencer we can also make use of sockets for something else entirely. When animating interactive props it is difficult to get the desired results with forward kinematics (FK). A prop is usually attached to one of the hand bones and thus receives influence from the entire chain of bones up to the root bone. This makes animating both hands to stay in contact with the prop challenging.
It is much easier to animate just the prop and let the arms be solved with inverse kinematics (IK). Which makes a lot of sense considering how we actually use props in the real world. Nobody consciously thinks about their shoulder, elbow or wrist when writing with a pen.
To enable this workflow we must first adjust our skeleton to support animating props in an appropriate parent bone space.
# Preparing the Skeleton
In order to animate a prop with minimal influence of other bones we must attach it to an appropriate parent bone. The root and spine bones are good candidates depending on whether you want the prop to move with the spine or not. At this point we should also mention the existence of virtual bones in Unreal Engine that may find their use here.
We will go with a spine bone as parent and create a dedicated prop bone.
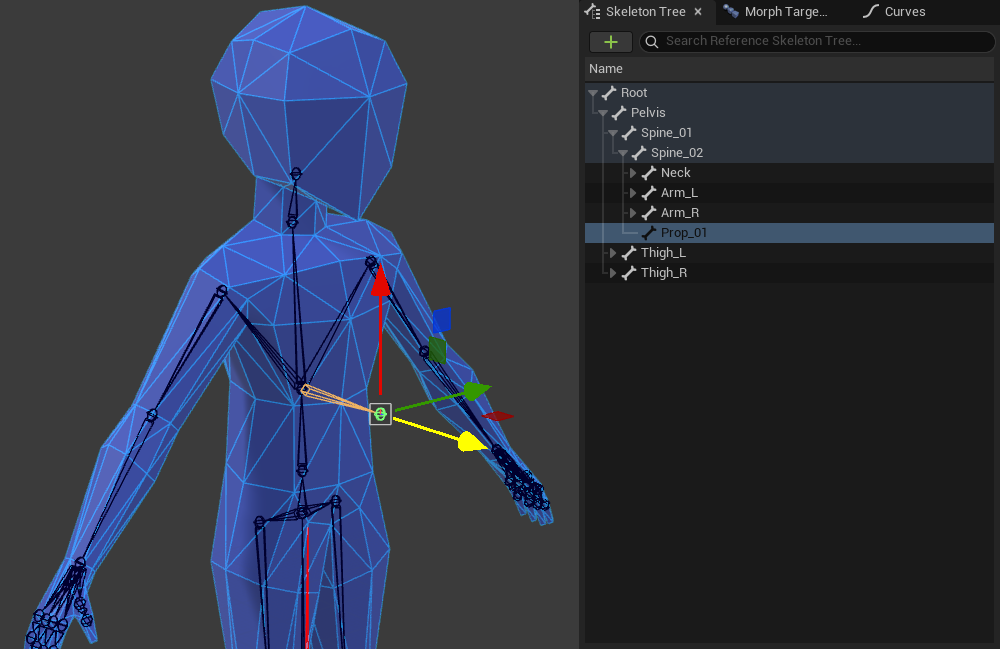
We will attach a prop to this bone in-game, but not in sequencer! I recommend adding a well-named socket at this point (e.g. Socket.Prop.Primary) and creating an appropriate FK control for this bone in control rig.
Now we are ready to animate with…
# Constraints & Sockets
Let’s say we wanted to author an animation to throw a prop (e.g. a barrel). We create a new level sequence and add our skeleton, control rig & barrel as sequencer tracks.
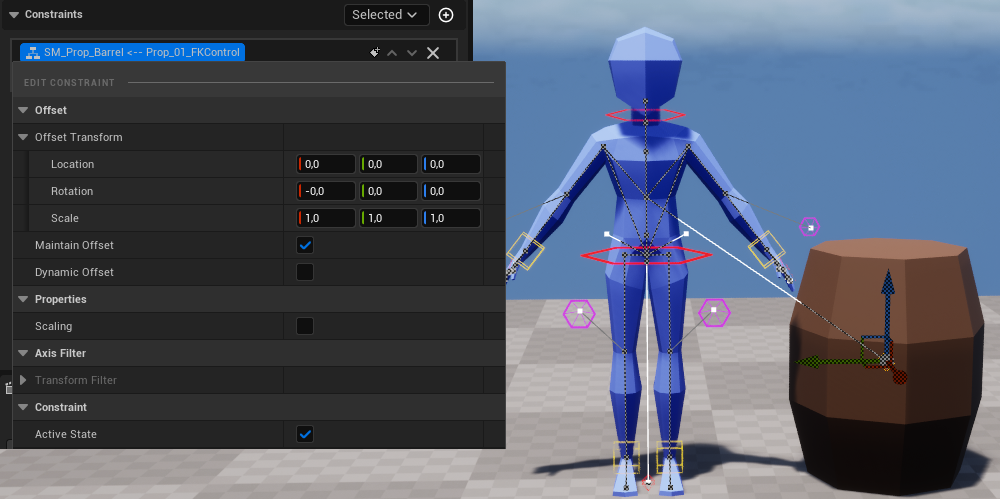
So what do we do with our prop control now? The first step is to make the prop control follow our prop using a constraint.
Select the prop control and constrain it to the barrel. A selection of static mesh sockets pops up.
It does not really matter in this case but I recommend using an Offset Socket here, for instance at the bottom of the barrel. No selection (= origin of the mesh) will do just fine though.
Make sure you zero out any offsets within the constraint itself by right-clicking on it in the “Constraints” tab. This is another powerful feature of constraints, but we do not need it for our purposes.
The prop is now constrained to and animates with the barrel. We animate the barrel in world space and thus the prop bone without any parent bone chains to worry about.
But what should we do about our IK hand controls? How do we precisely attach them to the barrel? We could manually position them in each keyframe but…
- ❌ A lot of work for each frame
- ❌ Difficult to get precise hand poses
- ❌ Fragile if we change the animation
- ❌ Have to repeat all that work if we change the mesh or proportions of the barrel
- ❌ Have to repeat all that work for other throwable props, e.g. a crate, cardboard box etc.
What tool can we use to do this? We can declare a relative-to-our-barrel transform at design-time! We tell Unreal: “Hey, when this barrel moves in sequencer make sure to place the hand IK controls exactly here”.
Much like with our attachment example we are declaring a transform on the mesh that is ideal for placing our hands on.
Hence the naming convention Socket.Grip.Primary and Socket.Grip.Secondary for the main & off hand respectively.
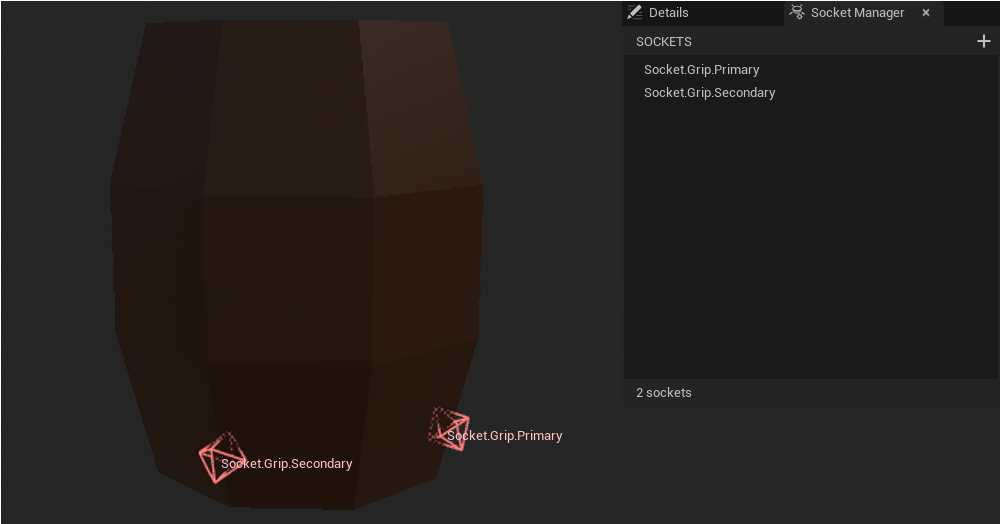
Now we simply repeat the earlier steps: Select the right hand IK control and constrain it to the barrel at socket Socket.Grip.Primary. Conversely for the left hand IK.
The hand IK controls are now constrained to and animate with the gripping positions on the barrel.

Now we can keyframe the prop & hand IK controls for our throw animation, bake it out to a sequence and simply attach a barrel to our prop bone in-game. The hands will continue to accurately follow the gripping positions on the barrel, at least until we need to detach it to enable physics simulation again.
This brings many advantages:
- ✔️ No work per frame required, set up constraints once and they remain active for any chosen frames
- ✔️ Easy to set up sockets once for precise hand positions in all animations
- ✔️ When changing the animation hands adjust automatically
- ✔️ When changing the mesh and proportions of the barrel hands adjust automatically
- ✔️ Can easily bake out dedicated animations for other throwable props
# Hitboxes
Hitboxes are at the core of most combat systems. We want some sort of geometric shape to describe where in space our attacks are effective. There are a few possible ways to handle this in Unreal Engine but they boil down to two principles: Overlap checks and shape/line traces. In the context of an action combat system traces are often better than overlap checks but the following approach may find use regardless of what traces are used for.
# The Grammar of Space
We have explored what we can do with one socket, but what happens when we add more sockets to the equation? If we have 2 sockets we can calculate a line that describes the distance between them. Or we can interpret both transforms as points in space that describe a shape:
- We can calculate a box using 2 sockets: origin and half-extent.
- We can calculate a sphere using 2 sockets: origin and radius.
- We can calculate a capsule using 3 sockets: origin, radius and half-height.
If you are familiar with tracing in Unreal Engine you may notice that those are the basic shapes for sweep traces. Can you guess where I’m going with this? We can use sockets to define where our weapons apply damage and then trace that exact shape!
# Executing the Trace
Say we wanted to define a hitbox for a greatsword. We can create 3 sockets Socket.Hitbox.Origin, Socket.Hitbox.Radius and Socket.Hitbox.Length to define a capsule around the blade.

This workflow allows us to get a very tight fit around the damaging parts of our weapons. Using our code from Offset Sockets we can provide a small C++ utility to get the required distance between our sockets:
TOptional<float> GetDistanceBetweenSockets(const USceneComponent* Component, const FName FromSocket, const FName ToSocket)
{
    if (const auto From = GetSocketTransform(Component, FromSocket))
    {
        if (const auto To = GetSocketTransform(Component, ToSocket))
        {
            return FVector::Distance(From->GetLocation(), To->GetLocation());
        }
    }
    return NullOpt;
}
And now we can get the capsule’s properties and execute a trace:
const FGameplayTag OriginSocket = FGameplayTag::RequestGameplayTag(TEXT("Socket.Hitbox.Origin"));
const FGameplayTag RadiusSocket = FGameplayTag::RequestGameplayTag(TEXT("Socket.Hitbox.Radius"));
const FGameplayTag LengthSocket = FGameplayTag::RequestGameplayTag(TEXT("Socket.Hitbox.Length"));

const FTransform CapsuleOrigin = GetSocketTransform(WeaponMeshComponent, OriginSocket.GetTagName());
const float CapsuleRadius = GetDistanceBetweenSockets(WeaponMeshComponent, OriginSocket.GetTagName(), RadiusSocket.GetTagName());
const float CapsuleLength = GetDistanceBetweenSockets(WeaponMeshComponent, OriginSocket.GetTagName(), LengthSocket.GetTagName());

FHitResult Hit;
const FCollisionShape Capsule = FCollisionShape::MakeCapsule(CapsuleRadius, CapsuleLength);
// We trace from origin to origin (i.e. a length of 0) because the capsule already encompasses the blade
// And since the socket transform is returned in component space we also get the appropriate rotation
GetWorld()->SweepMultiByProfile(Hit, CapsuleOrigin.GetLocation(), CapsuleOrigin.GetLocation(), CapsuleOrigin.GetRotation(), TEXT("SomeTraceProfile"), Capsule);
Which is similarly easy to implement in blueprint but I would highly recommend executing frequent hitbox traces in C++ instead.
Now that we have a hitbox tracing system in place we can integrate it into our combat system and see the results.

There are multiple advantages we gain from this approach:
- ✔️ Data-driven workflow
- ✔️ Accurate hitboxes
- ✔️ Visually define hitboxes directly on the weapon mesh
- ✔️ Each weapon can provide its own unique hitbox
# Compatibility with TargetingSystem
In my project I use Unreal’s TargetingSystem plugin. It provides a data-driven approach to traces by creating UTargetingPreset assets.
These assets specify:
- How to trace with
UTargetingSelectionTask - What filters to apply on the traced hits with
UTargetingFilterTask - What sorting/ranking to apply on the results with
UTargetingSortTask
And allow for a very powerful data-driven workflow for any tracing needs as well as great debugging tools. On top of that we can customize many aspects of these tasks.
Our hitbox shape tracing can be fully automated by subclassing UTargetingSelectionTask_Trace and overriding relevant methods.
But this is a topic for another day!
# Other Types of Sockets
We have established that sockets in Unreal Engine are really nothing but relative, design-time transforms. All of these techniques also apply to skeletal mesh sockets, although we have to account for the fact that those can be animated, physically simulated etc.
But the list does not end there.
# Proxy Actors
The term proxy means a “stand-in” for something or someone else.
There is a common technique in game development to place proxy actors in levels instead of placing actual actors directly. By doing so we tell the level: “Something can spawn here but we won’t tell you what it is yet”. In a sense, proxy actors are just sockets on the level itself and we can use them to spawn anything into them at runtime.
Now we won’t go into detail why we would want to do this, but here are just a few advantages:
- ✔️ The actual actor is not loaded into memory until it is needed
- ✔️ We can hotswap which actor gets spawned without touching or changing the level
- ✔️ DLCs and mods can easily modify our levels
There is much more to it. What I’m trying to say here: A “socket” does not need to look like or be called a “socket”. It’s transforms all the way down. Well, you get it by now. Very useful stuff.
# Transform MakeEditWidget
Another relevant hidden feature in Unreal Engine is using plain FTransform (or Transform in blueprint) variables with the MakeEditWidget meta attribute.
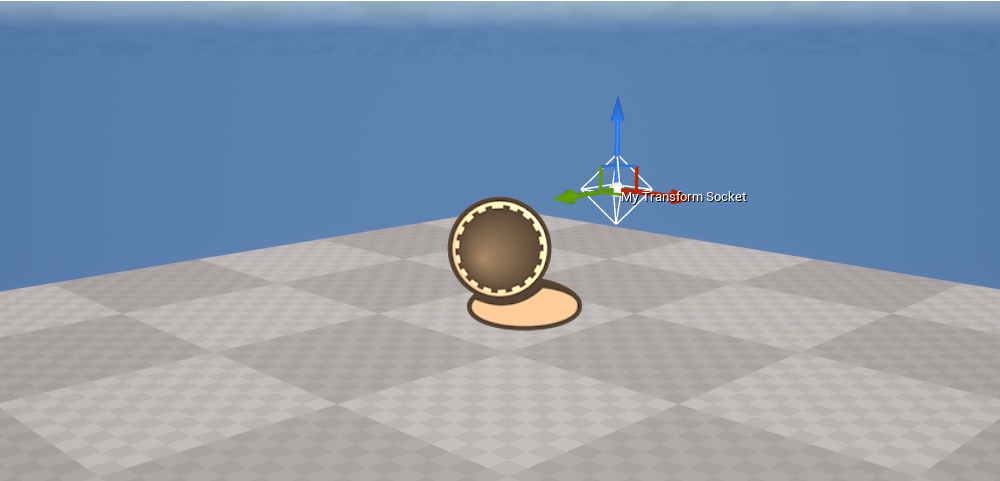
UPROPERTY(EditAnywhere, meta=(MakeEditWidget))
FTransform MyTransformSocket;
In blueprint the same can be achieved by declaring a Transform variable, making it public and checking “Show 3D Widget” in the variable’s details panel.
This gives us a small widget in the level e.g. on an actor. We can drag it around and place it visually which is better than guessing transform properties in the details panel.
This utility works nicely with invisible actors that spawn something else, like trigger shapes or indeed our proxy actor. Instead of using the transform of the actor directly we specify one or more named transforms (or “sockets” if you will) to spawn other actors at. This gives us another useful data-driven workflow and more flexibility while designing levels. Neat!
# Final Thoughts
Video games are hungry for transforms. The more we can define at design-time the less we have to worry about runtime calculations, bespoke management systems & code complexity. We are visual creatures, computers are not. These techniques help us bridge the gap.
Thanks for reading! You can check out planned & in-progress posts on the Kanban page and follow me on 𝕏 for updates.